Pritunl is the open-source management interface for OpenVPN. It allows private networking, has native IPv
6 support, and is relatively simple to use.
That said, it is also updated regularly and allows full customization. In addition to the features mentioned above, it also supports custom routing, and you can choose key sizes to improve performance.
Prerequisites
To install Pritunl, you will need:
- A CentOS 7 system (supports 32-bit and 64-bit systems).
-
Root access (determine whether you are the root user by running the following command):
whoami). - At least 512 MB of RAM, or the lowest plan.
- MongoDB.
-
Either
nanoorvim(text editor). - SELinux disabled.
Installation
Install dependencies
To install Pritunl, we need to use yum. Yum is essentially the package manager for CentOS and RHEL systems. It is similar to apt-get, so if this is your first time, don’t worry.
We will use nano for this tutorial, but you can use vim if you prefer.
The first thing we need to do is add the MongoDB repository:
nano /etc/yum.repos.d/mongodb-org-3.4.repo
Once you open that file, it should be empty. Paste the following:
[mongodb-org-3.4]
name=MongoDB Repository
baseurl=https://repo.mongodb.org/yum/redhat/7/mongodb-org/3.4/x86_64/
gpgcheck=1
enabled=1
gpgkey=https://www.mongodb.org/static/pgp/server-3.4.asc
Press CTRL and O together to exit and save. Once you do that, simply press the “Enter” key.
Now that we have added the MongoDB repository (Pritunl’s database software), we need to add the Pritunl repository.
nano /etc/yum.repos.d/pritunl.repo
When the file loads in the text editor, paste the following:
[pritunl]
name=Pritunl Repository
baseurl=https://repo.pritunl.com/stable/yum/centos/7/
gpgcheck=1
enabled=1
Exit and save.
Next, we need to install epel-release:
yum -y install epel-release
Now we have all the required dependencies. Before continuing, we need to disable SELinux:
nano /etc/selinux/config
Once opened, it should say the following:
# This file controls the state of SELinux on the system.
# SELINUX= can take one of these three values:
#     enforcing - SELinux security policy is enforced.
#     permissive - SELinux prints warnings instead of enforcing.
#     disabled - No SELinux policy is loaded.
SELINUX=enforcing .
# SELINUXTYPE= can take one of these two values:
#     targeted - Targeted processes are protected,
#     minimum - Modification of targeted policy. Only selected processes are protected.
#     mls - Multi Level Security protection.
SELINUXTYPE=targeted
Change the SELINUX=enforcing line to SELINUX=disabled.
Restart the server and log in again.
Install Pritunl
We have added all the necessary packages and changed the settings required to install Pritunl.
Before installation, we need to add some keys (required for the repository to work):
gpg --keyserver hkp://keyserver.ubuntu.com --recv-keys 7568D9BB55FF9E5287D586017AE645C0CF8E292A
gpg --armor --export 7568D9BB55FF9E5287D586017AE645C0CF8E292A > temp.tmp; sudo rpm --import temp.tmp
We can now delete the temporary key:
rm -f temp.tmp
Now, we will run yum to install Pritunl:
yum -y install pritunl mongodb-org
Once yum finishes, we will enable Pritunl and MongoDB to run at startup:
systemctl start mongod pritunl
systemctl enable mongod pritunl
Pritunl is now installed.
Configuration
After installing Pritunl, run the following command:
pritunl setup-key
Make a note of the key generated by running the command above.
Now, visit your server:
https://YOUR_IP_ADDRESS
You should see the following:
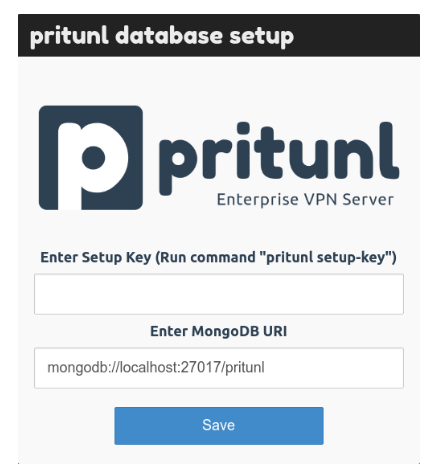
Paste the key you received from pritunl setup-key.
Once you click the “Save” button, you will be prompted to set up your credentials. You will then be redirected to the login page:
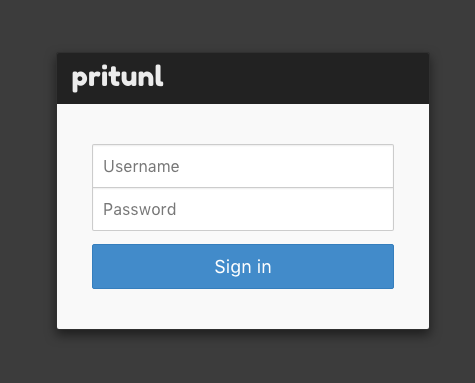
Sign in with your credentials. Continue to the next section on adding users and creating your first VPN server.
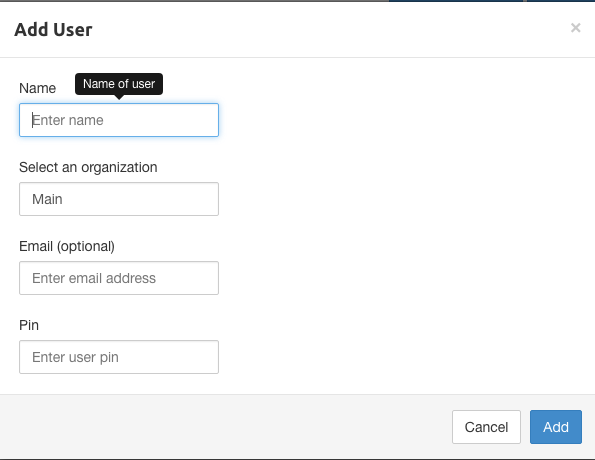
Add Users
If you want to allow other users (whether friends or coworkers), click the “Users” link in the navigation bar:

You should already have created an organization, and creating a user is simple. Click “Add
user”, and you will get the following prompt:
Create a VPN Server
As mentioned earlier, Pritunl only manages OpenVPN.
Go to the “Servers” tab in the navigation bar, then click “AddServer”. You will see the following prompt:
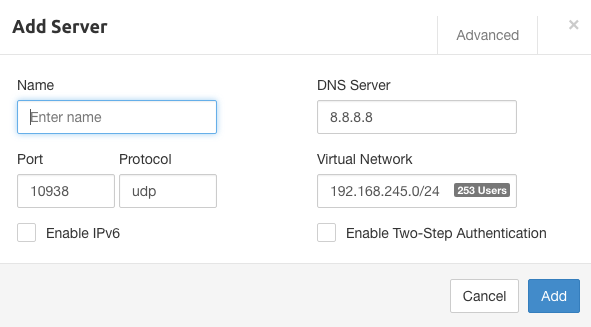
Fill in the appropriate information in the fields. You can choose the protocol (UDP is better for speed over shorter distances), the local IP range, and other options available through the “Advanced” tab.
Once you click “Add”, the dialog box will close. After that, click “Attach Organization”.
Select the organization we created in the previous section, as well as the VPN server created in this section.
Click “Attach”
Connect to the VPN Server
Since Pritunl uses OpenVPN, connecting should be easy. You can choose to install the Pritunl client or a standalone OpenVPN client.
Note: Installing a client is necessary to connect.
Before installing the client, return to the “Users” tab in the admin interface. You should see the icon next to the user you created:

A tar.gz file will begin downloading. After extracting it, you will get the configuration files needed to connect. Save the files in a safe place.
You can download it from the official website. The client supports all OpenVPN servers.
Improve Security
To enhance security, enable two-factor authentication with Pritunl! Pritunl provides two-factor authentication. It adds this functionality to OpenVPN. You can use Authy, or any supported app, to generate the codes you can use to connect.
Conclusion
Congratulations! You have installed and configured your own VPN server.
If you need to uninstall it, the process is simple. Run: yum remove -y pritunl mongodb-org
Enjoy!