Connect to VPN Gate Using SoftEther VPN (SSL-VPN)
This document describes how to use SoftEther VPN Client to connect to a VPN relay server on VPN Gate.
By using SoftEther VPN
Client, you can easily, comfortably, and quickly establish a VPN
connection. Please note that SoftEther VPN Client runs only on Windows.
Install SoftEther VPN Client with the VPN Gate Client Plugin
(Only needs to be installed once the first time)
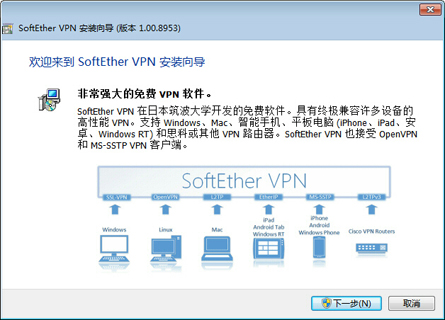
Download the special version of SoftEther VPN
Client that includes the “VPN Gate Client Plugin”.
Software Download
windows-vpngate software download
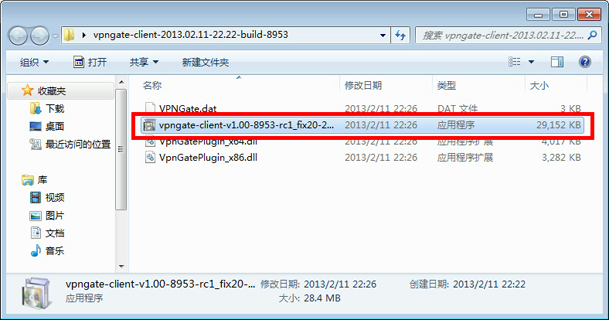
Extract the contents of the downloaded ZIP
file into a folder. As shown above, the installer and some DLL
files will be extracted.
Run the installer whose filename begins with “vpngate-client”
and continue with the installation.
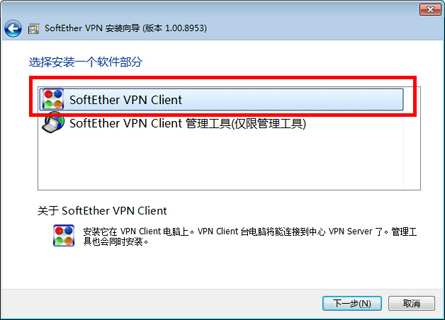
The installer shown above will start. You must select “SoftEther VPN Client” on the “Select Software Components to Install”
screen.
After installation is complete, a SoftEther VPN Client icon will be created on the desktop.
2. Run the VPN Gate Client Plugin and connect to a VPN Gate server
Double-click the SoftEther VPN Client icon on the desktop.
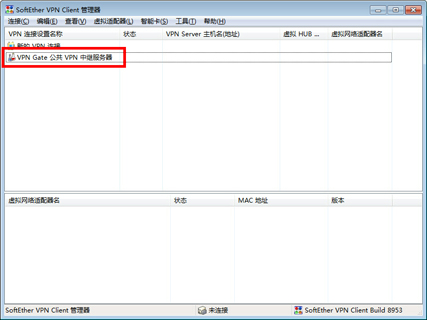
As shown above, the “VPN Gate Public VPN Relay Servers”
icon will appear in the window. Double-click that icon.
If a notification appears, proceed as described on the screen.
The “VPN Gate Academic Experiment Project Plugin
for SoftEther VPN Client” will start.
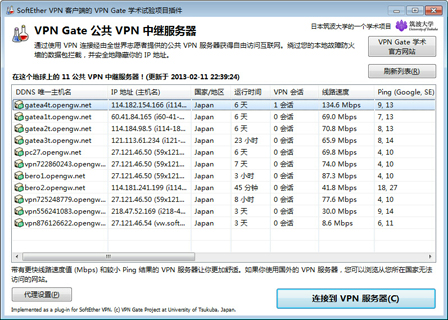
On this screen, you can see a list of the currently available VPN Gate public VPN
servers. The list on this screen is the same as the list on the top page. Select a connection from the list, then click the “Connect to the
VPN
Server” button.
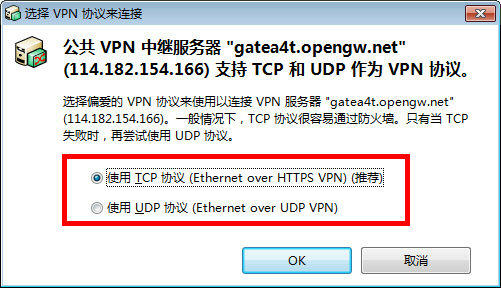
If the selected VPN Gate server supports both TCP and UDP
protocols, the screen above will appear. Choose TCP or UDP on that screen.
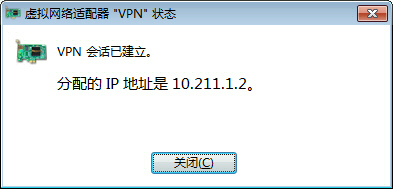
If a VPN connection is established successfully, the message above will appear. This window will automatically disappear after
5 seconds. If you cannot connect to the specified VPN
server, try again.
3. Enjoy the Internet via the VPN relay
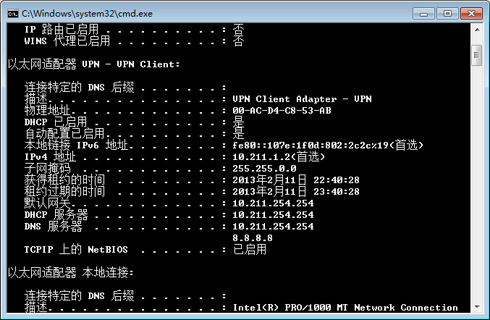
When a VPN connection is established, a virtual network adapter will be created on Windows
and assigned an
IP address starting with “10.211”. The default gateway address will be assigned to the virtual network adapter. You can run the
“ipconfig / all” command at the Windows command prompt to verify these network settings.
When the VPN is established, all communication to the Internet will be forwarded through the VPN
server. You can verify this by using the “tracert 8.8.8.8” command in the Windows command prompt.
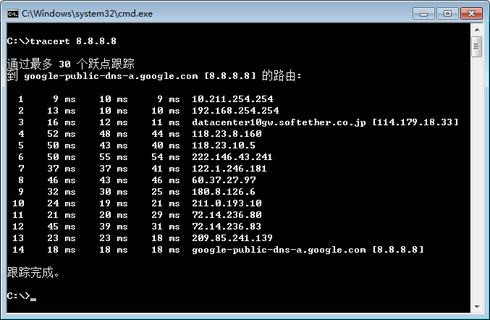
As shown above, if the packet path goes through “10.211.254.254”
, your communication is now being relayed through one of the public VPN
servers on VPN Gate.
You can also visit the VPN Gate Top Page to see your current global IP address. If you connect to a
VPN server located in a foreign country, you will see that your country or region of origin has changed to another one.

Once your VPN connection is established, enjoy YouTube, Facebook, or Twitter.
Facebook, Twitter, and Gmail use HTTPS (SSL)
encrypted communication protocols. Whether through a VPN
or not, no one can eavesdrop on these encrypted communications.